It’s been a while since I’ve posted the last tutorial. Due to some unexpected events I finally found some time to write a new one.
The default autonav Block in Concrete5 allows you to add a navigation/menu to your site in almost no time. But as soon as you want to use images it get a bit more difficult. In this tutorial I’m going to show you, how you can specify pictures for each page and pull them in an autonav template.
Page attributes
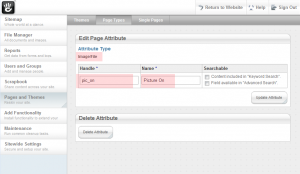
Concrete5 allows you do add different kinds of attributes to your page. You can use them to manage meta tags, tags, notes, thumbnails or images for your navigation. First we have to create two new page attributes where we can select the pictures. One which will be shown if the page is currently active and one for inactive pages.
All the important information has a red overlay:
- Attribute type must be Image/File
- The Handle is used in the template, make sure you remember it
- The Name is just a description to explain what the use of the attribute is
Assign images
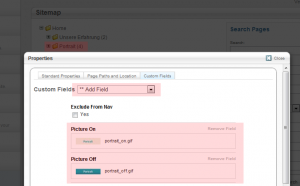
We have two new attributes where we can assign some images. The following screenshot explains this:
- In the sitemap, open “Properties” for the page where you would like to see an image in the navigation
- Go to the last tab “Custom Fields” and add the two fields you just created
- Select the image you want to see if the page is active and inactive
Do this for all the pages where you’d like to have an image instead of a text link. You can always add and modify the images for the pages. Even your end-user can add new image menu item this way. One of many reasons why page attributes are so powerful!
Custom Autonav Template
If you haven’t worked with custom template you should probably read this tutorial first: http://www.codeblog.ch/2009/03/concrete5-templates/.
To create a new custom template, simply copy /concrete/blocks/autonav/view.php to /blocks/autonav/templates/image_navigation.php. You probably have to create the folders autonav and templates first.
Around line 55 you should see this code (might be different, depending on your c5 version:
1 2 3 4 5 6 7 8 9 10 | if ($c->getCollectionID() == $_c->getCollectionID()) { echo(' <li class="nav-selected nav-path-selected"><a class="nav-selected nav-path-selected" href="' . $pageLink . '">' . $ni->getName() . '</a>'); } elseif ( in_array($_c->getCollectionID(),$selectedPathCIDs) ) { echo(' <li class="nav-path-selected"><a class="nav-path-selected" href="' . $pageLink . '">' . $ni->getName() . '</a>'); } else { echo(' <li><a href="' . $pageLink . '">' . $ni->getName() . '</a>'); } |
With some HTML and PHP knowledge you probably have already found the place which outputs the link text. It’s of course “$ni->getName()”. This is the code which we have to modify to display images if they’ve been selected.
We replace $ni->getName() with variables which will hold the html code for the image or the link text:
1 2 3 4 5 6 7 8 9 10 11 12 13 14 15 16 17 18 19 20 21 22 23 | $linkTextActive = $ni->getName(); $linkTextInactive = $ni->getName(); $picOn = $_c->getAttribute('pic_on'); $picOff = $_c->getAttribute('pic_off'); if ($picOn) { $linkTextActive = '<img src="' . $picOn->getURL() . '" alt="' . $linkTextActive . '"/>'; } if ($picOff) { $linkTextInactive = '<img src="' . $picOff->getURL() . '" alt="' . $linkTextInactive . '"/>'; } if ($c->getCollectionID() == $_c->getCollectionID()) { echo(' <li class="nav-selected nav-path-selected"><a class="nav-selected nav-path-selected" href="' . $pageLink . '">' . $linkTextActive . '</a>'); } elseif ( in_array($_c->getCollectionID(),$selectedPathCIDs) ) { echo(' <li class="nav-path-selected"><a class="nav-path-selected" href="' . $pageLink . '">' . $linkTextActive . '</a>'); } else { echo(' <li><a href="' . $pageLink . '">' . $linkTextInactive . '</a>'); } |
- Line 1,2: The new variables
- Line 4,5: Get the attribute values – the image
- Line 7-12: Checks if the attribute has a value and replaces the link text
Now you can add an autonav block, set all the properties and after you’ve added the block, click on it again an hit “Set Custom Template”. If you create our custom template in the correct folder, you should now be able to select it.
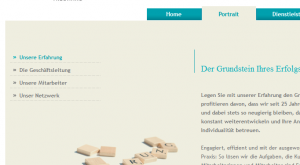
If everything worked you should now have a top navigation like this:


